Home Automation with Arduino and ESP8266 using Tuya IoT Platform
- Jun 7, 2021
- 8 min read
Updated: May 28, 2022

Hello everyone, welcome to the article. We have already progressed and are still progressing towards becoming a complete digitally connected society. Humans are now connected better than ever before wherever they go, whatever they do. It is indeed important to constantly keep improving the standards and methods of this worldwide connectivity through the Internet of Things (or) IoT.
Today we are exploring something really really exciting. Today we will explore a lot of what Tuya IoT has to offer in the space of IoT as its name suggests and smart connectivity in general. We will not beat around the bush at any part of the article and will quickly go over what a Tuya Sandwich Evaluation Kit is and what it has to offer in itself and how it can easily be used by anyone. Then we will also use Tuya's IoT platform to showcase some real and practical solutions that it provides. Let's dive right in without further ado.
Bonus Fun Fact: Now, you can be a part of the Arduino Beta Test Program with Tuya and win some really really exciting gifts worth $7.5 and even more if you provide your valuable feedback!
1. About Tuya IoT and Tuya Sandwich Evaluation Kit

Tuya IoT Platform is a powerful platform to help brands, developers, retailers, and manufacturers get into the IoT/Smart Home space and quickly grow their products and businesses. Some many products and appliances can be customized on Tuya IoT. There are some pre-built products as well which are based on the Tuya Platform and can prove to be very useful in our daily life.
Now, let's dive into all there's to the Tuya Sandwich Evaluation Kit. This is Tuya's wonderful development platform which is heavily compatible with the Arduino ecosystem. Tuya Sandwich Evaluation Kit as its name suggests is like a sandwich, assembled layer by layer, which allows you to quickly implement a complete IoT based environment in a very hassle-free manner. Any Arduino Ecosystem-based device can be integrated through the Tuya cloud modules of various communication protocols such as Zigbee, BLE, Wi-Fi, and NB-IoT. To sum it all in a single line, Tuya Sandwich Evaluation Kit is going to make your IoT life easier than ever before. Let's have a closer look into the various components involved to get a better picture out of it, shall we?
Tuya Developers: Tuya for Developers
2. More About the Components

Let's go over the components of the Tuya Sandwich Evaluation Kit:
2.1. Power Supply Board: The Power board provides stable and continuous electricity for the development kit to strengthen the power supply capability of the master control board. It can also output different electrical levels for device debugging.

2.2. Microcontroller Board: The microcontroller board can input and output peripheral information and send out commands and is heavily compatible with the Arduino ecosystem.

2.3. Communication board: The wireless communication board provides various networking capabilities to the master control board. The Wi-Fi communication board with voice capabilities supports local far-field voice wake-up, online speech recognition, and device control.

2.4. Function Board: The function board provides substantial peripheral functions for the Evaluation Kit, such as sensors and actuators.

3. Real-Life Application - Home Automation Project Using ESP8266 & Arduino With Tuya IoT Platform
Now we will be building some real and practical stuff using the above knowledge. We will make a simple home automation project using an ES8266 module connected to an Arduino board along with the Tuya IoT Platform. We will get an ordinary bulb to turn on via WiFi through our setup using a mobile phone. So, let's get started.
3.1 Gather Required Stuff!
There's not much that would be needed in terms of hardware for this project as it is just a basic representation of the capabilities of the Tuya IoT Platform.
All components you will be needing are:
An Arduino Board
A Relay Module
A Power Supply Module
An ESP8266 Module
A Breadboard
A Few Jumper Wires

3.2 Wiring / Connections / Circuit Diagram
In technical terms, the wiring involved in any project is directly proportional to the number of components involved in it. In simple terms, the wiring or the connections for this project are very simple again as we earlier mentioned it is a very simple project. The software side of things is what will mostly matter to us here. Let's quickly get over to the circuit diagram. Have a look at the images below for a reference to the circuit diagram.


Detailed Connection Instructions:
3.2.1 Firstly connect the power supply board/module onto the breadboard as this will help eliminate any power-related issues in the circuit later on and will also make it easy to supply power to all components easily.

3.2.2 Then connect the ESP8266 module onto the breadboard for easy pin-access to the module. Also, connect the power pins of the module to the power supply module or the rails of the breadboard.

3.2.3 Then fix the Arduino board onto the breadboard so that it doesn't move much which will help you work easily with it. Then connect the ESP8266 according to the above diagram to the Arduino board.

3.2.4 Lastly connect the relay module to the breadboard as that is the main output of our circuit.

3.3 Setting up the Tuya IoT Platform
In the previous step, we did the hardware configuration part. Now, in this step, we will be setting up the Tuya IoT Platform for operating the smart bulb and after that, we will upload the code in the Arduino UNO board with the help of Arduino IDE which will complete the setup. We need to follow the steps given below.

3.3.1 Before using the Tuya IoT platform you need to make sure that you have an account on that platform. You have to register your details and create an account. As soon as the account is created, you will be able to access the Tuya IoT platform. Then you need to log in using your credentials and you are ready to go.
Now as you log in to the Tuya IoT Platform. On the left-hand side, you will see a Products button click on that and the products tab will open up. Under the products tab, there you need to click on the Development button.
When you will click the Development button you will see a "Create" button in the middle of the screen click on that and the new product development screen will open up in front of you.

3.3.2 Here we need to select the type of product that we are going to make. In our case, we are making a smart bulb, so we will quickly go to the Lighting section now we have to select the Category so here under General Lighting we will select Light Source.
After the Category has been selected, we will Select a Solution for our product as we are making a Custom Product so we need to select Custom Solution and then click on Light Source.

3.3.3 Now we have to enter the Product Information Details. Here we have to enter the Product Name. You can give any name you like.
We are using the ESP8266 WiFi module. Therefore under Protocol, we need to select Wifi and after that select Standard Power Consumption. When all these are done, click on the Create button.

3.3.4 As you click the Create button, the platform will ask you to add the standard functions that you want in your Product. Now we need to select the ON/OFF function from the list of functions present on the left-hand side which has a DP ID-20. When selected it will appear on the right-hand side under the selected functions list and after that click the OK button. We are only adding this function because we just need to switch the Relay ON or OFF.

3.3.5 Once all this Product Definition thing is done, we need to head over to the Hardware Development tab. Here we need to select the Integration method as Tuya Standard Module SDK. As we select the Integration method, a list of modules will open up. From this list, we need to select the module that we are using. In our case, we need to select the TYWE1S Wi-Fi Module/ESP8266 Module.
Copy the PID and send it to devops@tuya.com together with your Tuya IoT account name to get your Token ID. We will need it later on.
3.4 Integration of Tuya with ESP8266
GitHub Reference: Click Here to Go There
Sign up for the PMS System and login to the portal.

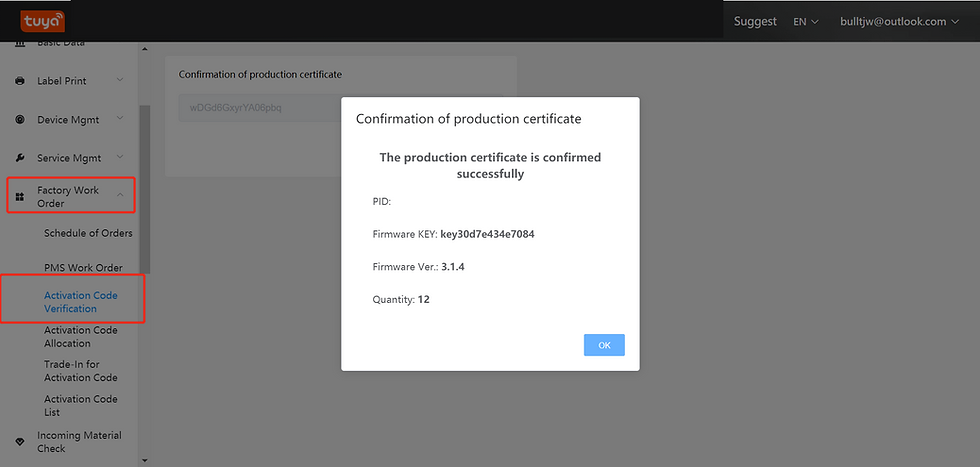
Select Factory Work Order > Activation Code Verification. Then, input the Token ID that you got previously and click on confirm. One Token ID can only be activated by one user.

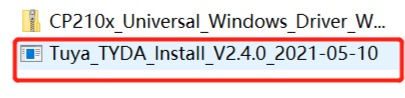
Download installations package on the google drive: Installation Packages.
Install the Tuya_TYDA_Install_V2.4.0 and login with your PMS account. And then click Online Login. You can choose Automatic Login and Remember The Password as per your wish.

You must set up the Burning Baud and click Ok for the doing setup for the first time.

Insert the USB interface of ESP8266 to your PC and install ESP8266 driver CP210x.


Click Enter Token to input the token and select Work Station > Buring Authorization.
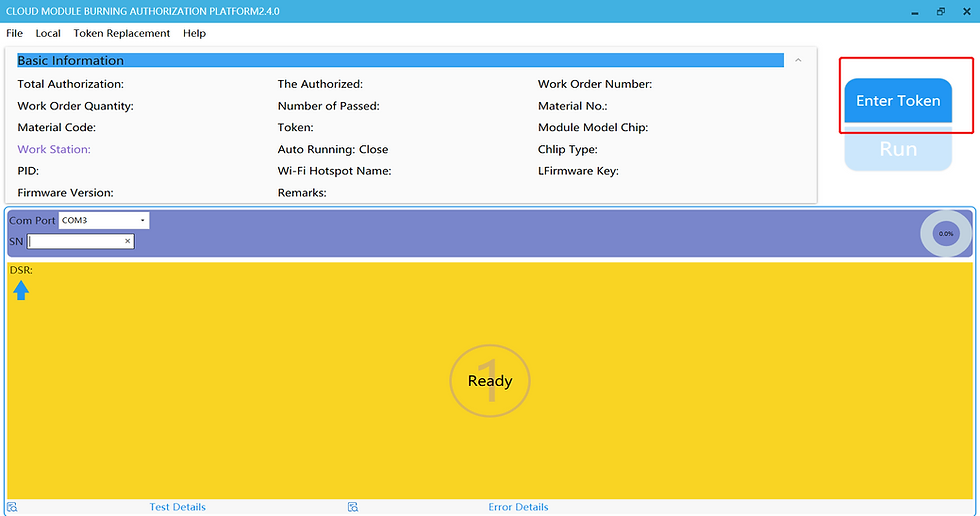

Then click OK. The following page is displayed.

Then click RUN. The burning starts. Wait till it gets to 100%.


And that was it for this section of fiddling around with ESP8266 and Tuya. Now head over further into the article.
3.5 Software Side of Things

3.5.1 Now we need to do the Arduino side of things for our project. Two approaches are available for doing this as stated below:
Open Arduino IDE and click the Sketch menu and then Include Library > Manage Libraries. Find Tuya_WiFi_MCU_SDK and install.
Download the Tuya_WiFi_MCU_SDK library package. Unzip it and copy all of these files to the libraries folder inside your sketchbook. To find the location of your sketchbook folder, go to the top menu in Arduino IDE: Windows: File > Preferences. macOS: Arduino > Preferences.
Restart Arduino IDE and verify that Tuya_WiFi_MCU_SDK appears in the Sketch > Include Library > Contributed libraries.

3.5.2 Now we need to upload the code to the Arduino UNO board. You can get the code for this project at the end of this article. Copy the code in your Arduino IDE. Now head over to the code that you have opened in the Arduino IDE. Here we need to replace the PID and the module firmware version in their corresponding places. Once this is done, we need to connect our Arduino UNO board to our laptop, Select the correct board, COM port, and hit the upload button.

3.5.3 Now after doing this we need to download the Tuya Smart app into our mobile phone and log in with our account on that. When the app opens up, you will see a page saying No devices and a button that says "Add device".
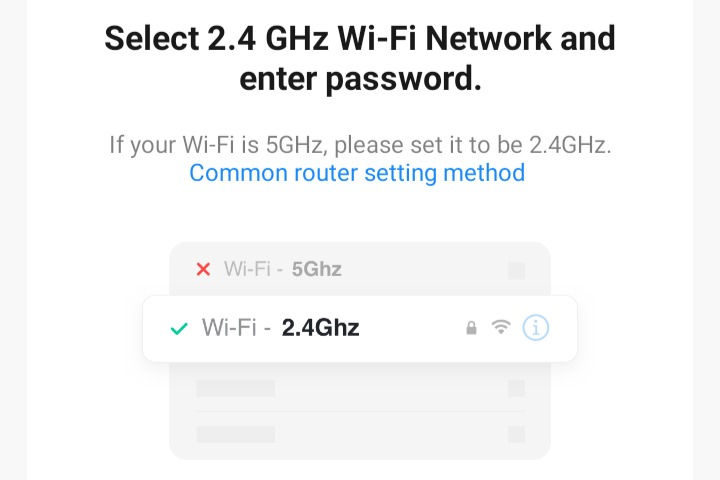
3.5.4 After clicking the Add Device button, you need to click on the Auto Scan button. Once the device is found in the Auto Scan, you just need to enter your Wifi SSID and Password and hit the confirm button.

3.5.5 The screen will show Connecting with a Percentage bar on it. When the devices are connecting, you will see that the LED will keep on blinking which is a sign showing that the LED is connecting to the Wifi and once it is connected. The blinking will turn OFF.

3.5.6 Now you will see that the device has been added successfully and you will see that the name that you gave to your device appears automatically with the device. Now click on Done and after that, you will see the Arduino Relay device with an ON/OFF button.
Toggle the button to turn the LED ON and the LED bulb should turn ON as shown in the below image.
Now toggle back the button to its initial state to turn the LED bulb OFF like it was previously.

3.6 Make Your Own App Using Tuya
Now we will see how you can make your own app using the Tuya platform which will help you easily create a user interface for your IoT products or projects.
Firstly go to your Tuya dashboard. Then go over to your product or project that you wish to work on. Now go over to the Device Panel section and then you will be able to see a QR code on your screen. Now, go over to the Tuya app on your smartphone and scan the QR code present here. After this, you will directly be able to see your custom app interface for your product/project.


4. Conclusions - Tuya: The True IoT Champion 🏆
Well, this was all we had to fiddle around within this article. As you saw, the Tuya IoT platform lived up very well to its claims and turned out to be such an amazing IoT solution. The great features and accessibility that it provides are fabulous. We were very easily able to set up the platform and get it running in no time and the same pretty much applies to anyone out there even with almost beginner-level expertise in the IoT space.
Comments